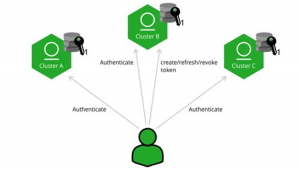
安全访问|使用JFrog Access建立“信任圈Circle of Trust”
Circle of Trust(Cross-Instance Authentication)
- 跨实例身份验证
访问令牌不仅可以用于创建它们的实例或集群,还可以用于所有属于同一“信任圈”(如下所述)的其他实例和集群。 - 用户和非用户身份验证可以用于用户验证,也可以分配给非用户实体,例如 CI 服务器作业。
- 基于时间的访问控制
访问令牌有一个有效期,因此您可以控制您授予访问权限的时间段。同时,你也可以将有效期控制权委托给接收用户,通过设置refreshable - 灵活的范围
将令牌分配给不同的组(applied-permissions/groups),您可以控制它们的访问级别。 - 配对令牌
管理 不同 JFrog 微服务之间的连接。
说明:
Access tokens 通过 circle of trust 支持跨实例身份认证,创建 circle of trust需要在所有参与的实例之间共享 public certificate。
- 服务管理员来确保所有参与的实例都配备了证书。
- 任何实例都可以生成一个令牌,用于信任圈内的任何其他实例。
- Trusted certificates 可以在服务器运行时加载和删除,不需要重新启动。
本质上, circle of trust 意味着服务将针对所有 trusted certificates 验证访问令牌签名,包括在circle of trust 中的其他服务生成并设置为“trusted”的证书。
注意:
- Access 将基于在 access.config.file 文件设置中的revocable-expiry-threshold 参数检查 token 的 revocation ,默认为6小时,小于此值将标记为不可撤销(non-revokable);大于此值则视为能被撤销的(revokable)
token:revocation:revocable-expiry-threshold: 21600 # Available from Artifactory 7.8.0 - (seconds) token with expiry (expirationTime-issuedAt) below this value will not be revocable. (tokens without expiry are always revocable) set to -1 to make all tokens with expiry non-revocable (default). - 如果token被创建于一个不同的server,由于它不在此实例的checked database中(除非使用Access Federation),当token被检查具有可撤销的性质(revocability)时,则它将会被视为已撤销(revoked)
- 因此,默认情况下,只有不可撤销(non-revokable)且具有过期时间的(tokens with expiry) tokens 才能用于与创建它的实例不同的实例上的身份验证。
- 默认情况下,只有生成token的实例可以刷新令牌。关于跨服务同步令牌,请参见Access Federation(https://www.jfrog.com/confluence/display/JFROG/Access+Federation)

建立Circle of Trust
- 信任可以是双向的,也是可以是单向的;
- 拷贝到目标trsuted/目录时,可以重命名root.crt以便于区分和管理,如rt1.crt、rt2.crt;
- 文件的属主和权限: “artifactory: artifactory 600″;
- 信任圈内的服务彼此具有完整的管理权限;
- root.crt 将被放置在Artifactory数据库中,并在trusted/目录中消失;
- 查询语句:select config_name from access_configs where config_name like ‘%crt’;
实践
- 安装参考:
- 官方链接:https://www.jfrog.com/confluence/display/JFROG/Installing+Artifactory#InstallingArtifactory-SingleNodeInstallation
- 中文参考:https://github.com/JFrogChina/JFrog_Self-Hosted/blob/main/Single%20Node%20Installation/RPM%20Installation
2.(可选)使用外部数据库:
- 中文参考文档中的Artifactory使用的内置的derby数据库
- 如需使用外部数据库可参考:https://www.jfrog.com/confluence/display/JFROG/Configuring+the+Database
- 推荐使用:PostgreSQL v10.x to v13.x
- 安装Postgres参考:https://www.postgresql.org/download/
- 如果安装过程中网络状况不良,可以使用国内源:https://mirrors.tuna.tsinghua.edu.cn/postgresql/repos/
二、启动后,输入License(两个实例需要输入两个不同的License)
- 申请试用License的链接 Start a Free Trial (https://www.jfrogchina.com/start-free/)
三、分别将自己的root.crt 按原权限拷贝到对方的 trusted/目录中。
在第一个Artifctory实例中操作:(作者的第二个Artifactory的IP是192.168.56.52,请替换为自己的IP)
$ cd /opt/jfrog/artifactory/var/etc/access/keys
$ scp -rp ./root.crt root@192.168.56.52:/opt/jfrog/artifactory/var/etc/access/keys/trusted/51.crt
$ scp -rp root@192.168.56.52:/opt/jfrog/artifactory/var/etc/access/keys/root.crt ./trusted/52.crt
四、生成token
方法有两种,其一是在UI中创建,其二是通过API,建议使用API(在各个不同的版本中UI页面有所变化,而且创建的token也并不相同)
1. 在UI中,Administration页面,点击”Identity and Access” -> “Access Tokens” -> “Generate Admin Token”
Expiration time 选择自定义为1h (需小于revocable-expiry-threshold) -> ‘”Generate”, like this:
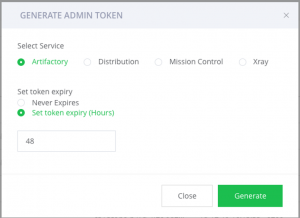
“access_token” : “eyJ2ZXIiOiIyIiwidHlwIjoiSldUIiwiY……”,
“refresh_token” : “d72ea940-764……”,
“expires_in” : 3600,
“scope” : “member-of-groups:readers”,
“token_type” : “Bearer”
}
拷贝tokenID 和token备用;
五、使用token进行测试
1.测试连通性,需要admin的token即可(可以使用在UI中创建的token)
# curl -H “Authorization: Bearer <TOKEN>”-XPOST “http://sourceIP:8082/access/api/v1/system/federation/validate_server”-H “accept: application/json” -H “Content-Type: application/json” -d “{ \”url\”: \”http://targetIP:8082/artifactory/api/access\”}” -vvL
* About to connect() to 192.168.56.51 port 8082 (#0)
* Trying 192.168.56.51…
* Connected to 192.168.56.51 (192.168.56.51) port 8082 (#0)
POST /access/api/v1/system/federation/validate_server HTTP/1.1
User-Agent: curl/7.29.0
Host: 192.168.56.51:8082
Authorization: Bearer eyJ2ZXIiO…………
accept: application/json
Content-Type: application/json
Content-Length: 60
* upload completely sent off: 60 out of 60 bytes
< HTTP/1.1 204 No Content
< Cache-Control: no-cache, no-store, max-age=0, must-revalidate
< Date: Fri, 29 Apr 2022 05:52:35 GMT
< Expires: 0
< Pragma: no-cache
< X-Content-Type-Options: nosniff
< X-Frame-Options: DENY
< X-Jfrog-Version: JFrog Access/7.41.7
< X-Xss-Protection: 1; mode=block
<
* Connection #0 to host 192.168.56.51 left intact
2.用于具体的接口,需要使用API创建的token(需要相应权限),此token可以用于两个Artifactory实例
# curl -H “Authorization: Bearer <TOKEN>” -XGET “http://192.168.56.52:8082/artifactory/api/repositories?type=remote”
[ {
“key” : “example-repo-local”,
“description” : “Example artifactory repository”,
“type” : “LOCAL”,
“url” : “http://192.168.56.51:8082/artifactory/example-repo-local”,
“packageType” : “Generic”
} ]
其他注意事项
售前咨询

联系电话
预约演示